Most people shop for an emergency shelter by browsing products. A better first step is choosing the type of shelter, because the differences between types are larger than the differences between brands. A foil bivvy and a four-season tent solve the same problem in opposite ways, and neither is wrong. They suit different people, different packs and different emergencies.
This comparison sorts portable shelters into four types and judges each on the same criteria. The best portable emergency shelter is the one that matches where you will actually be when things go wrong, and what you can do with cold hands in bad light. If you are brand new to the subject, our beginner guide to emergency shelter essentials covers the fundamentals. This piece assumes you are ready to choose.
What a portable emergency shelter actually has to do
An emergency shelter exists to keep you from losing body heat faster than you can make it. That sounds narrow, but it covers most of what matters. Heat leaves your body through wind, through contact with cold ground, through wet clothing, and by radiation to the open sky. A good shelter reduces as many of those as it can.
Notice what is not on the list: comfort, headroom, or a good night’s sleep. An emergency shelter has to get you through a bad night alive and in decent shape. Comfort is a bonus.
This is why shelter sits so high in the priorities covered in the Rule of 3. In cold, wet or windy conditions, exposure can become life-threatening before thirst or hunger ever matters. Your shelter is the thing standing between you and that problem.
An emergency shelter also has to work when you are at your worst: tired, stressed, possibly injured, with numb fingers and fading light. A shelter that performs well only for a calm person on a dry afternoon is a camping product, not an emergency tool. Every judgment below starts from that point.
How to judge them: setup speed, weather protection, condensation, weight and durability
Five criteria separate the types in practice.
Setup under stress. How many steps are there, and do any of them need fine motor control? Knots, thin cord, tiny stakes and shock-corded poles are all harder with cold or gloved hands. A shelter you can deploy in a minute or two is worth more than a better one that takes fifteen minutes of fiddling.
Wind and rain protection. Wind drives rain sideways and strips heat from every exposed surface. Look at how much of your body is covered, whether the openings can be closed, and how the shelter holds up when it is pushed from the side.
Condensation. Your breath and body moisture have to go somewhere. In a sealed, non-breathable shelter, they collect on the inside walls and drip back onto you and your insulation. Wet insulation loses much of its value, so condensation is a real safety issue, not just a nuisance.
Packed weight and size. The shelter you leave at home protects nobody. Weight and bulk decide whether a shelter stays in the pack through every trip, so judge both honestly against the pack you actually carry.
Durability. Many emergency shelters get used once, but “once” may mean a windy night on rocky ground. Consider how easily the material tears, how it handles sharp objects, and whether you can fold it back up after use.
No type wins on all five. Each one trades some against the others, which is why the comparison below ends with scenarios rather than a single winner.
Emergency bivvies and survival bags: lightest option, biggest trade-offs
An emergency bivvy is a sack made of thin, waterproof, reflective film that you climb into. It is the most compact shelter you can buy. Many fit in a jacket pocket or the corner of a small pouch, and they cost very little compared with the other types. Heavier, reusable versions exist, usually made from tougher fabric, and they are worth distinguishing from the thin disposable kind.
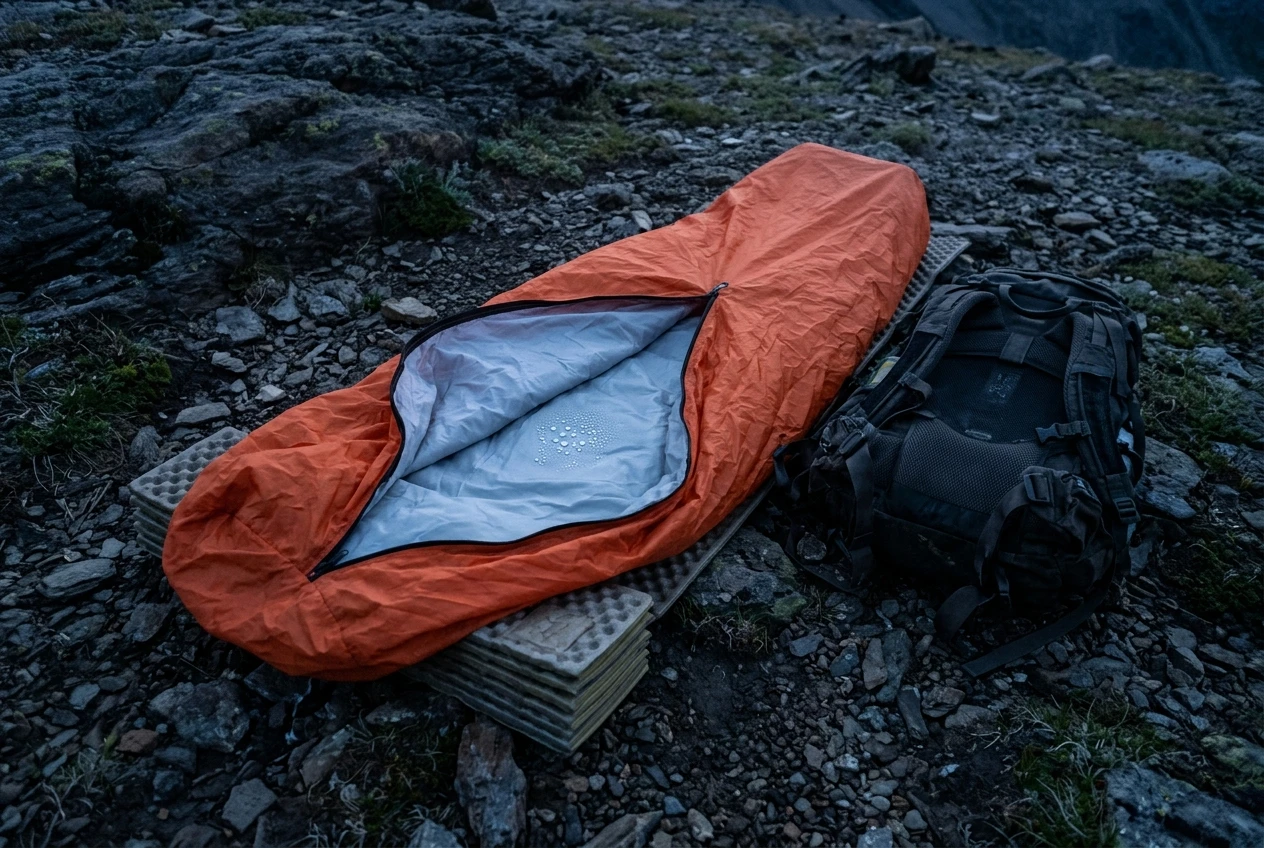
Setup. The best feature of a bivvy is that it has almost no setup. You open it, get in, and close the opening. There are no knots, poles or anchor points, and it works on bare ground, in a vehicle, or in a ditch. This is the fastest option of any type.
Weather protection. A bivvy blocks wind and rain over your body, and the reflective surface returns some radiated heat. It does not cover the space around you, so you cannot sit up and move around, change clothes, or keep gear dry outside the bag. The thin film also gives almost no insulation from cold ground. You still need something between you and the earth, such as a pad, a pack, a rope coil, or a layer of dry leaves or boughs.
Condensation. This is the bivvy’s biggest weakness. The film is not breathable, and your body moisture condenses on the inside. In a cold night you can end up with damp clothes inside a sealed bag, which is the opposite of what you want. Opening the bag a little for ventilation helps, at the cost of some warmth.
Weight and size. Excellent. Nothing else in this comparison gets close.
Durability. The thin disposable versions tear easily and are difficult to refold to their original size. Treat them as single-use. Reusable bivvies made from sturdier material hold up better, but check the maker’s current listing for fabric, weight and dimensions, since these vary a great deal between models.
Best role: a last-resort layer, or a backup carried in addition to something better. It is a good tool for a person who has nothing else.
Tube shelters and emergency tents: cheap, fast and where they fall short
A tube shelter is a long tube of plastic or similar film, open at both ends, that you crawl into. An emergency tent is a close relative: usually a tube or simple tent shape made of the same type of material, sometimes sized for two people. Both are inexpensive and light, and both are common in budget emergency kits.
Setup. Simple, but a little slower than a bivvy. Many tube shelters work as a sleeping tube on the ground, and you can also string a cord between two anchor points and drape the tube over it to make a tent-like shape. The cord option gives you more room and better ventilation, but it needs two anchor points and some knot work. Check whether cord is included, as it is often thin and short.
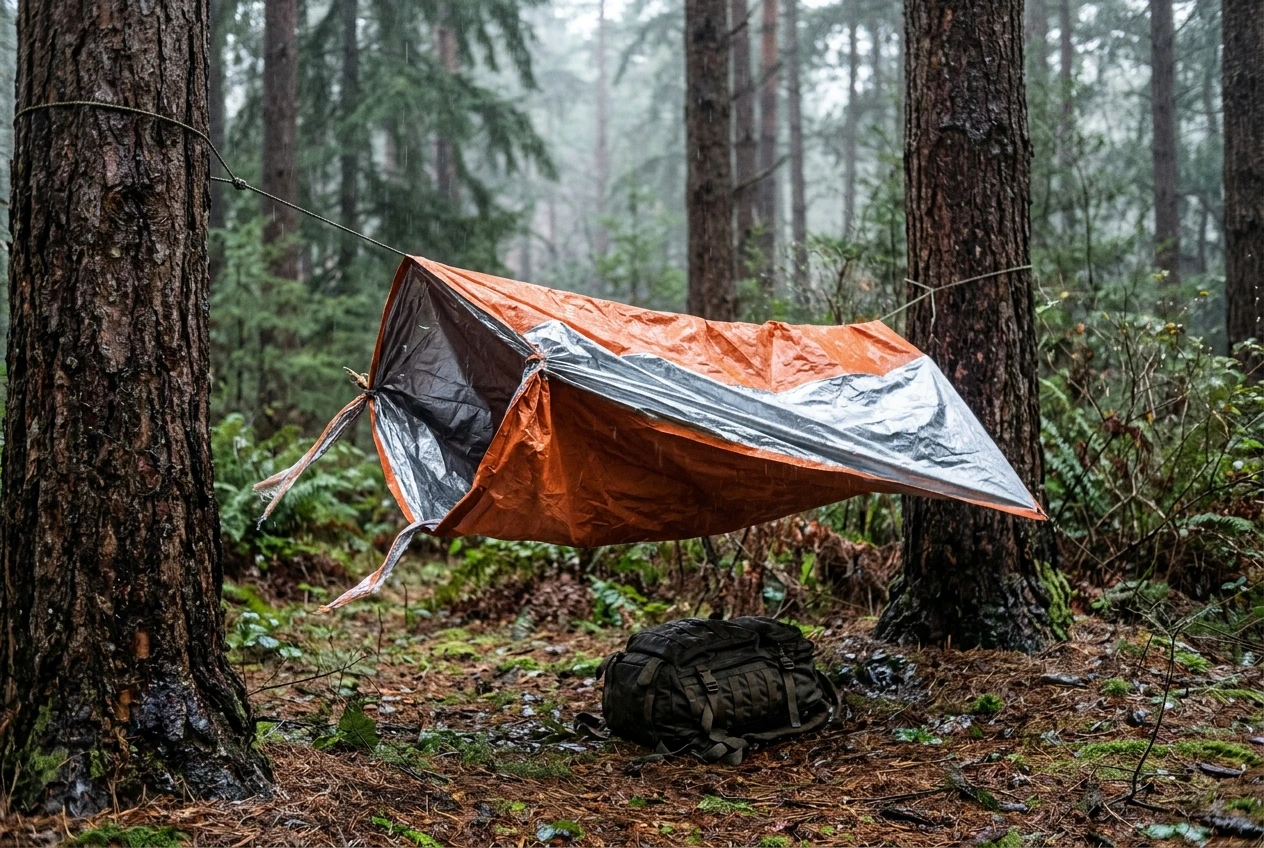
Weather protection. More room than a bivvy, which means you can sit up, shift position and keep some gear with you. The open ends are a problem in wind. Many designs let you gather and tie the ends, which helps, but it never seals as well as a bag. Strong wind can also flap or tear thin film, and rain can blow in the ends.
Condensation. The film does not breathe, so condensation forms here as well. The extra air volume and the option of leaving an end open make it easier to manage than in a bivvy. You can trade warmth for dryness more flexibly.
Weight and size. Small and light, though larger than a bivvy. Many tube shelters pack to a size that fits easily in a go-bag.
Durability. Low to moderate. The film punctures and rips along folds, and the cord that comes with a shelter is usually the weakest part. Replacing it with sturdier cord costs little and is one of the best upgrades you can make.
Best role: a budget option for a vehicle kit, a family go-bag, or anyone who wants more room than a bivvy provides. It is a sensible step up from the bivvy for little extra weight, provided you accept its limits in strong wind.
Ultralight tarps and tarp systems: flexibility that demands skill
A tarp is a sheet of fabric you pitch with cord, stakes and anchor points such as trees, trekking poles or rocks. Modern ultralight tarps are made from coated nylon, coated polyester or similar fabrics, and they range from basic to highly engineered. If you are choosing between fabrics and sizes, our guide on how to choose a survival tarp goes into that in detail.
Setup. This is where tarps ask the most of you. A pitch usually needs a ridgeline or other support, several guy lines and some stakes, plus a few knots you can tie reliably. Practised users can set up a tarp quickly in a wide range of terrain. People who have never done it will struggle, especially in wind or the dark. The tarp rewards skill and punishes a lack of it.
Weather protection. Highly variable, and that is the whole point. A tarp pitched low and close to the ground with the windward side down can shed wind and rain well. The same tarp pitched high for ventilation or a view gives much less protection. You choose the trade-off every time, so you need to understand what each pitch does. A tarp also has no floor, so you need separate ground insulation, and driven rain or splashing can reach you in an open pitch.
Condensation. Better than any of the sealed types, because air moves through the open sides. This is the main reason experienced users prefer tarps in humid or cold conditions. Many tarps also work well over a bivvy bag, which gives wind and rain cover from the tarp and a warmth layer from the bag.
Weight and size. Light for the area covered, and often no heavier than a compact tent’s fly alone. Add cord, stakes and a bit of spare line, and the total goes up, so weigh the full kit and not only the sheet.
Durability. Generally good with quality fabrics. A tarp is also easy to repair or improvise with, and the material has uses beyond shelter, such as a ground sheet, a rain catcher or a signal panel.
Best role: the best all-round choice for people willing to practise. Learning to pitch one in several configurations takes some time, and the skill carries over to improvised shelters. If you want to build natural shelters from what’s around you as well, our guide on how to build a debris hut for cold weather pairs well with tarp skills.
Compact tents and bivy tents: the most protection for the most weight
At the heavy end are small, purpose-built tents. A compact backpacking tent has poles, a floor, a rainfly and stakes. A bivy tent is a low-profile, one-person tent with just enough room to lie down, usually with a hoop or pole at the head end.
Setup. Easier than a tarp, harder than a bivvy. Freestanding designs are the simplest: you assemble the poles, clip or slide the body on, and add the fly. Practice makes a big difference here too, and poles can be awkward in the dark. Bivy tents are often quicker than larger tents but have less room to work in.
Weather protection. The strongest of the four types. A floor, closable doors and a taut fly give you a full enclosure against wind, rain, insects and ground moisture. A well-pitched four-season tent handles weather that would shred the lighter options. Three-season tents work well in most conditions but may be a poor choice in serious snow or high winds.
Condensation. Depends on the design. Double-wall tents, with a breathable inner body and a separate fly, manage moisture best. Single-wall bivy tents using waterproof-breathable fabric reduce condensation but do not eliminate it, and ventilation still matters.
Weight and size. The heaviest and bulkiest option here. Weights vary widely between models, so check the maker’s current specifications for packed weight and dimensions before you decide. A tent that is too heavy for your pack will end up at home.
Durability. Generally the best, with the right care. Poles and zips are the usual failure points, and a repair sleeve and a few spare parts weigh little.
Best role: anywhere weight matters less than protection, such as a vehicle kit, a base camp, or a trip into serious weather. For a hiker who wants one reliable shelter for a multi-day trip, this is often the right answer.
Side-by-side summary
Type Setup under stress Weather protection Condensation Weight and size Durability Emergency bivvy Fastest Basic, covers body only Worst Lightest, smallest Low (disposable) to moderate Tube shelter Fast Moderate, open ends Poor to moderate Very light Low Ultralight tarp Slowest without practice Good to excellent, skill-dependent Best Light, plus cord and stakes Good Compact or bivy tent Moderate Best Moderate to good Heaviest Good
Which shelter to pack for a go-bag, a car kit and a backcountry trip
These recommendations are judgments based on the trade-offs above, not rules. Adjust them for your climate, your pack and your experience.
Go-bag
A go-bag has to be light enough that you will carry it, and the shelter has to work for someone who may not have practised. A tube shelter or a sturdy reusable bivvy is the practical core. If you have the skill and a little spare weight, add a small tarp with proper cord. The combination gives you a fast fallback and a more capable option when you have time.
Car kit
Weight is the least of your worries in a vehicle, so carry something that gives real protection. A compact tent is a strong choice if you might have to leave the car and camp nearby. If space is tight, a tarp with cord and stakes plus a bivvy bag covers a lot of situations. Remember that a car interior is itself a shelter, though it gets cold quickly and stays cold, so you still want insulation and a plan for the engine and ventilation.
Backcountry trip
Here the right answer depends on the trip. For a multi-day hike in unpredictable weather, a compact tent or a well-practised tarp system gives you real protection. On a day hike where you are not planning to stay out, an emergency bivvy or tube shelter is a sensible backup that adds little weight. Many experienced hikers carry a bivvy bag as backup even when they are carrying a tent, because tent failure in a storm is a real possibility.
Whatever you choose, plan for the ground. Almost all of these shelters give little insulation underneath you, so a sleeping pad, a folded pack, or a thick layer of dry natural material matters as much as the shelter itself.
Before you buy: test it in your backyard first
A shelter that looks good on paper can turn out to be a problem in practice. A backyard test costs nothing and teaches you more than any review, including this one.
- Time the setup. Do it once in daylight and once in the dark with a headlamp. Do it again wearing gloves.
- Check the contents. Many budget shelters ship with thin cord and flimsy stakes. Find that out before you need them.
- Try to repack it. If you cannot fold it back to the original size, you will know how it will fit in your bag after real use.
- Spend a night in it. Lie down, move around, and notice where condensation forms and where cold air gets in.
- Test in rough weather. A windy or drizzly evening shows you problems a calm afternoon will hide. A hose gives you a rough rain test, though it is no substitute for real weather.
- Verify the specs yourself. Weights, packed dimensions and fabric details vary between models and change over time. Check the maker’s current listing and weigh the shelter on your own scale.
Practising also builds the skill that makes any of these shelters work. A mid-priced shelter you can pitch in two minutes in the dark will outperform an expensive one you have never touched.
Once you have chosen your shelter, check it against the rest of your gear in our Wilderness Survival Kit guide.